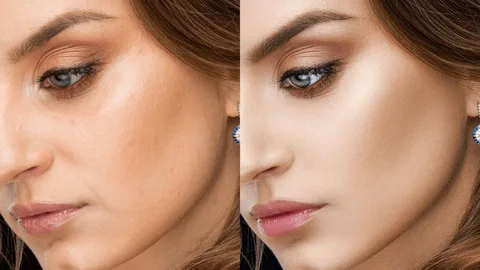
Retouching photos is one of the most important steps in photography. A clean and natural photo looks professional and appealing. Retouching does not mean changing the person or object completely. It means fixing small issues like light, color, or tiny spots. Beginners can easily learn retouching with simple steps. This guide will teach you easy techniques to make your photos clean and natural.
In this guide, oncepik shows practical tips that anyone can try. Using once pik, you will understand how to adjust light, remove distractions, and keep photos realistic. Beginners and hobby photographers can learn the best ways to clean up their photos without overdoing it. Many people use Oncepik to improve their photography skills. By following these techniques, you can make every photo look polished while keeping it natural.
Understanding Basic Retouching
Before you start retouching, you need to know what it is. Retouching is about small improvements. You can fix colors, remove spots, and make the photo look balanced. The goal is always a natural look.
Why Retouching Matters
-
Improves the photo’s overall look
-
Removes small distractions
-
Enhances lighting and contrast
-
Makes subjects look their best without looking fake
Retouching helps your photos tell the story you want. It also makes them more professional and attractive.
Tools Needed for Simple Retouching
You don’t need expensive tools to retouch photos. Some easy tools include:
-
Free apps on phones
-
Basic desktop photo editors
-
Simple software with adjustment options
These tools allow beginners to make small changes easily.
Adjusting Exposure and Light
Light is the most important part of a photo. Sometimes photos are too dark or too bright. Correcting exposure and light makes photos clear and natural.
Steps to Adjust Exposure
-
Open your photo in your editing tool.
-
Increase brightness if the photo is too dark.
-
Decrease the brightness if the photo is too bright.
-
Adjust contrast to make details stand out.
Tips for Natural Light Adjustment
-
Avoid extreme changes that look fake
-
Check shadows and highlights carefully
-
Use small adjustments for better results
Adjusting exposure is simple but makes a huge difference.
Correcting Colors
Colors in a photo should look natural. Sometimes the photo is too warm or too cool. Correcting color helps your photo look real.
Simple Color Correction
-
Adjust white balance for accurate colors
-
Increase or decrease saturation slightly
-
Check skin tones for a realistic appearance
Maintaining Natural Colors
-
Avoid making colors too bright
-
Use small adjustments to keep the balance
-
Compare with the original photo to check changes
Color correction improves the photo’s feel without making it artificial.
Removing Small Blemishes
Sometimes small spots, dust, or marks appear in photos. Cleaning them up makes the photo look polished.
Tools to Remove Blemishes
-
Spot removal tools in apps
-
Clone or healing brushes in desktop software
Simple Steps
-
Zoom in on the area with spots
-
Use spot removal carefully
-
Blend with the surrounding areas naturally
Avoid Overdoing
-
Only remove small distractions
-
Keep natural textures like skin and fabric
-
Don’t erase important details
This helps the photo stay real and clean.
Smoothing Skin and Textures
Smoothing skin can make portraits more polished. But too much smoothing looks fake.
Easy Skin Retouching
-
Use light smoothing tools or filters
-
Focus on areas like the cheeks or the forehead
-
Avoid removing natural lines completely
Tips for Natural Look
-
Apply smoothing in small areas only
-
Keep texture so the photo feels real
-
Compare with the original frequently
Smoothing should enhance the photo, not change it completely.
Sharpening Details
Sharpening makes your photo clearer. It subtly enhances eyes, hair, or edges.
How to Sharpen Photos
-
Use a sharpening tool in your editor
-
Focus on important details
-
Don’t sharpen the whole photo too much
Best Practices
-
Check the photo at full size
-
Avoid adding noise or grain
-
Use subtle adjustments for a professional look
Sharpening is the final touch to make your photos crisp and clear.
Cropping and Composition
Cropping removes unwanted areas and improves focus. Good composition draws attention to the subject.
Cropping Tips
-
Remove distractions around edges
-
Use the rule of thirds for balance
-
Keep natural proportions
Enhancing Composition
-
Straighten horizons if needed
-
Adjust framing to highlight the main subject
-
Keep the background simple for a clean look
Cropping is a small change, but it makes a photo much better.
Saving Photos Properly
Saving the photo correctly keeps the quality intact. Choose a proper format and resolution.
Best Practices
-
Save in high quality (JPEG or PNG)
-
Keep original files for backup
-
Avoid repeated saving in lossy format
Proper saving ensures your retouched photo looks good everywhere.
Tips for Beginners
-
Start with simple photos
-
Make small adjustments, not big changes
-
Compare with the original often
-
Practice regularly to get faster
-
Focus on clean and natural look
Even small edits can make photos look professional if done carefully.
Conclusion
Retouching is about making photos look their best while keeping them natural. Adjusting lighting, correcting colors, removing small blemishes, slightly smoothing skin, sharpening details, and cropping carefully are the main steps. Beginners can use oncepik to practice these techniques step by step. With patience and consistent practice, anyone can improve their photos, making them clean, professional, and visually appealing.
FAQs
Q1: What is photo retouching?
A: Retouching is fixing small issues in a photo to make it look clean and natural.
Q2: Can beginners retouch photos?
A: Yes. Simple techniques can be learned easily with practice.
Q3: Should I remove all skin lines in portraits?
A: No. Keep natural lines for a realistic look.
Q4: What is the best way to adjust the photo light?
A: Use small exposure and contrast changes to keep it natural.
Q5: Can retouching make photos professional?
A: Yes. Even simple retouching improves clarity, color, and overall appearance.