Photography is more than just pointing a camera and clicking. The way you arrange elements in a frame can make a huge difference in how professional-looking the photos are. Composition is all about guiding the viewer’s eye and creating a picture that feels balanced and interesting. Whether you are using a smartphone or a DSLR, following a few simple rules can help you take photos that stand out.
When you start learning, Pik can be a great resource. It gives clear examples and practical tips for beginners. By understanding composition rules, you can make your photos more engaging. Using once pik, you can learn how to frame your subject, choose backgrounds, and control what appears in the photo. Many beginners who follow these tips see an instant improvement in their shots. Oncepik also shows how small changes in angle, placement, or light can dramatically improve the overall photo quality.
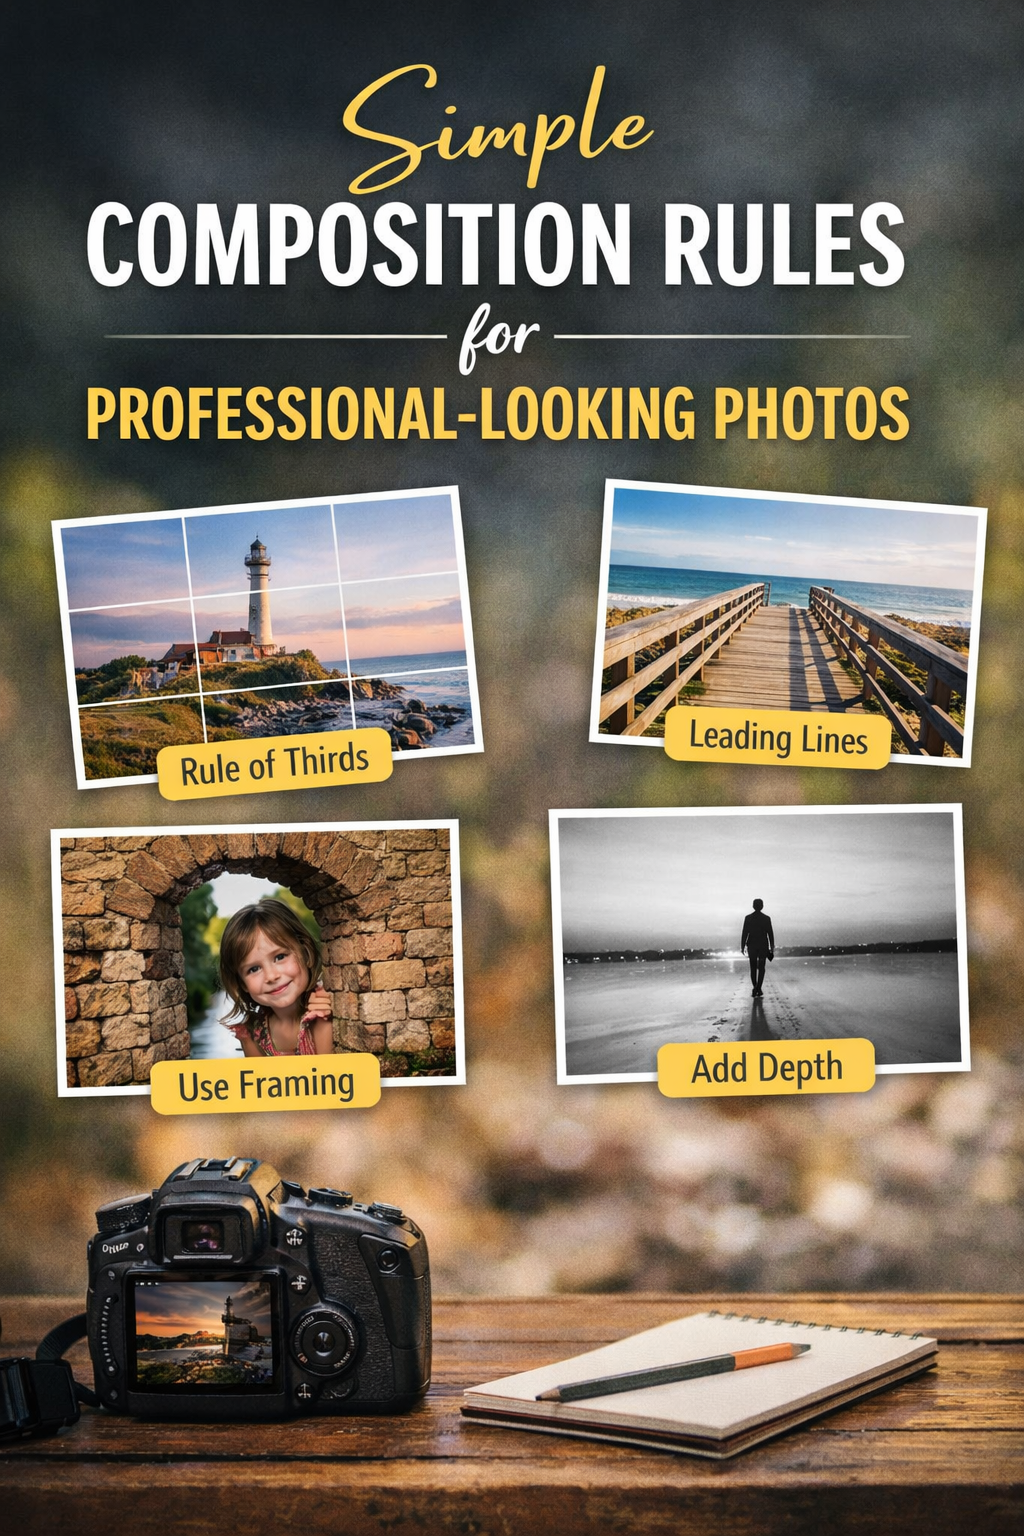
The Rule of Thirds
The rule of thirds is one of the most basic and effective composition techniques. Imagine dividing your frame into a 3×3 grid. Place important subjects along these lines or at their intersections. This creates balance and naturally draws the viewer’s eye to the main point of interest.
How to Apply the Rule of Thirds
-
Turn on your camera’s grid lines.
-
Place your subject on one of the vertical or horizontal lines.
-
Align points of interest with the intersections of the grid.
-
Experiment with off-center placement to add movement and interest.
Practical Tips
-
Don’t always put the subject dead center; off-center placement often looks more professional.
-
Use landscapes or objects in the background to complement the main subject.
-
Practice by photographing friends, pets, or objects using the grid.
Leading Lines
Leading lines are lines in your photo that guide the viewer’s eye to the subject. They can be roads, paths, fences, or natural lines like rivers. Leading lines create depth and can make photos feel three-dimensional.
Types of Leading Lines
-
Straight lines: roads, bridges, walls.
-
Curved lines: rivers, paths, or winding staircases.
-
Diagonal lines: give energy and movement.
Tips for Using Leading Lines
-
Place your subject at the end of the line to draw attention.
-
Look for natural lines in the environment.
-
Combine with the rule of thirds for extra balance.
Framing
Framing involves using elements in the scene to surround your subject. Frames can be doors, windows, arches, or tree branches. This technique focuses the viewer’s attention and adds context to your subject.
How to Use Framing
-
Look for natural frames around your subject.
-
Make sure the frame doesn’t overpower the subject.
-
Experiment with close-up and wide shots to see which looks best.
Benefits of Framing
-
Adds depth and layers to your photo.
-
Makes your subject stand out naturally.
-
Creates a storytelling element without extra effort.
Symmetry and Patterns
Symmetry and patterns can make photos feel pleasing and professional. Our eyes are drawn to repetition and balance. Capturing symmetry in architecture, reflections, or objects can create visually appealing images.
Using Symmetry in Photography
-
Find reflections in water or glass for symmetry.
-
Capture rows of trees, windows, or street lights.
-
Center your subject to enhance symmetrical patterns.
Breaking Patterns
-
Sometimes breaking a pattern can also make a striking photo.
-
Include a single different element to add contrast and interest.
Depth and Layers
Depth makes photos look three-dimensional and lively. Using foreground, middle ground, and background elements adds layers to your photo. It helps the viewer feel immersed in the scene.
How to Create Depth
-
Include objects close to the camera.
-
Use wide-angle lenses or adjust angles to emphasize layers.
-
Blur the background slightly to make the subject pop.
Tips for Beginners
-
Start with simple scenes and add one layer at a time.
-
Use shadows and light to separate layers.
-
Move around the subject to find the best perspective.
Balance and Space
A well-balanced photo distributes visual weight evenly. Negative space (empty areas) can enhance the subject and make it stand out. Crowded or cluttered photos often look less professional.
How to Achieve Balance
-
Avoid placing heavy elements on one side only.
-
Use empty space to emphasize the main subject.
-
Position subjects according to the rule of thirds for natural balance.
Tips for Effective Negative Space
-
Don’t fill every corner with objects.
-
Use sky, walls, or ground to give the subject room to breathe.
-
Negative space works especially well in portrait photography.
Color and Contrast
Colors and contrast affect mood and focus in photos. Bright colors can draw attention, while muted colors create a calm feeling. High contrast between the subject and background makes the subject stand out.
Using Colors Effectively
-
Complementary colors (opposite on color wheel) are eye-catching.
-
Harmonious colors (similar shades) create unity.
-
Contrast light and dark areas to highlight the main subject.
Practical Tips
-
Use natural light to enhance colors.
-
Avoid distracting backgrounds with too many colors.
-
Simple color palettes often look more professional.
Simplify Your Composition
Less is often more. Remove unnecessary elements that distract from the subject. Clean backgrounds and minimal props can make your photos stronger.
How to Simplify
-
Look for clean spaces or neutral backgrounds.
-
Remove clutter or objects that don’t add value.
-
Focus on one main subject per frame.
Why Simplicity Works
-
Helps viewers understand the photo quickly.
-
Makes the subject stand out.
-
Creates a professional and polished look.
Perspective and Angles
Changing your viewpoint can make ordinary subjects look interesting. Try shooting from high, low, or unusual angles to add drama or uniqueness to your photos.
Experimenting with Angles
-
Shoot from above to show scale.
-
Shoot from below to make subjects appear powerful.
-
Tilt the camera slightly to create dynamic compositions.
Tips for Beginners
-
Move around the subject to explore the best angle.
-
Use chairs, steps, or stairs to change height.
-
Combine angles with the rule of thirds for better framing.
Consistency in Style
Professional-looking photos often share a consistent style. This includes lighting, color, and framing. Consistency helps create a recognizable and polished look, especially when sharing photos online.
How to Develop a Consistent Style
-
Choose a few favorite composition rules to apply regularly.
-
Stick to similar lighting or editing techniques.
-
Practice regularly and review your photos critically.
Conclusion
Following simple composition rules can make a huge difference in how professional your photos look. Techniques like the rule of thirds, leading lines, framing, symmetry, depth, balance, color, simplicity, perspective, and style are easy to learn with practice. Using guidance from oncepik can make learning faster and more enjoyable. By practicing these techniques, beginners can create stunning images that tell a story, highlight the subject, and capture attention. Remember, great photography comes from observing, experimenting, and enjoying the process.
FAQs
Q1: What is composition in photography?
A: Composition is how elements are arranged in a photo to make it balanced and interesting.
Q2: Do I need expensive gear to follow these rules?
A: No, even a smartphone works if you follow the rules.
Q3: How can I improve my photos quickly?
A: Focus on framing, lighting, and simple composition techniques.
Q4: What is negative space in photography?
A: Negative space is empty space around your subject that helps it stand out.
Q5: Can beginners practice these rules anywhere?
A: Yes, you can practice at home, outside, or with friends and objects.